Creating a wellbeing website

Contributed by
West Dunbartonshire Health and Social Care Partnership
Introduction
West Dunbartonshire Health and Social Care Partnership commissioned Glasgow University, on behalf of the wider Community Planning partners, to complete a comprehensive review and analysis of children and young people’s community mental health and wellbeing services and supports. Findings indicated the need for increased visibility of community services including a digital map providing clear instruction on service access and suitability criteria. Feedback gathered in both the Young People Whole Family Wellbeing Fund survey, and Planet Youth survey of S3 year group in 2021 asked for more information to be available on mental health and wellbeing.
We therefore sought to produce a digital, single access point to a comprehensive bank of information including service access details, sources of support for mental health and wellbeing, self-care tools, and online resources in West Dunbartonshire, the NHSGGC Board area, and nationally.
This guide will show you step-by-step how you can create your own wellbeing website for children and young people.
Steps
Step 1: Do your research
Before you start on your journey of creating a website, spend some time conducting research with your target audience to understand what gap this might fill for them. We commissioned Glasgow University to undertake research for us, engaging with young people, families of children and young people, and those who work with young people and their families to understand the current gaps in provision and what needs were currently unmet by existing community mental health supports and services. This was done via an online survey, interviews (telephone and online), and focus groups (online and in-person).
Step 2: Commission a developer
Once you have a clearer picture of the need that your website could fill, you’ll then want to identify a web developer who can help bring your vision to life. You may have the capacity in-house or might need to commission someone externally to do this for you following your organisation’s procurement protocols (we followed West Dunbartonshire Council’s procurement process).
As part of this, you’ll want to create a specification of what you’re looking for. The specification we created for our web developer was to design and develop a website to provide a digital map of services information, self-help tools, and support information to be used by children, young people, their families, and the local workforce who work with these groups. We wanted to ensure the website would be widely accessible on PC, laptop, and mobile, and that it was relatively low maintenance due to the limited capacity of staff to manage information updates.
Step 3: Collaborate with your partners
Next, you’ll want to understand any work that is currently taking place that you can connect with as part of your overall site development. For example, we wanted to understand any work that was currently underway across community planning thematic groups and local working groups to gather information about local supports and services.
Colleagues from Children and Young People’s Community Mental Health and Wellbeing Support and Services Working Group shared with us information they had on this type of information-gathering. We also collaborated with social work, Violence Against Women and Girls Partnership, Youth Services, and Working 4U employability services to ensure we included relevant information that had already been gathered on local supports. In doing so, we avoided duplication of work, made better use of resources and knowledge, and enabled input from partners across the system.
Step 4: Design and content creation
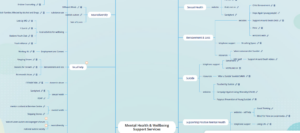
Then you’ll want to start to think about how your website looks and feels, thinking about the colours, visuals, and tone of voice that you use. You’ll also want to consider what information you want to include on the website, based on your overall aims and what is most important for your target audience. Creating a mind map and using collaboration tools can be useful in planning out and then creating all of your content.
For example, we spent a long time reviewing websites for children and young people, gathering ideas that we liked and ideas that we didn’t like. We wanted to use colours that were welcoming – not too bright or harsh. We discussed with stakeholders in the Working Group what we wanted to include and asked for their feedback and ideas.
In terms of content, we knew we needed to include different areas for different mental health and wellbeing needs and created a list of topic headings gathered from feedback from the Whole Family Wellbeing Fund survey and Planet Youth survey to help us do that. We gathered all this information using GitMind to create a mind map of the information we wanted to include. We shared the mind map with our website designers, who came back with a few designs to choose from.

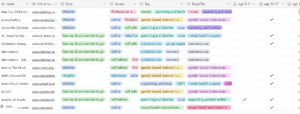
We then used Airtable to facilitate collaboration and to allow us to provide more details on each of the resources we wanted to include. We agreed on the information we wanted to be displayed for each resource on the website to help people decide if they wanted to visit the linked site: the type of resource (website, services, and somewhere to go, app) how to access the service (online, by referral, telephone) whether it was local or national, and if there was a cost involved. The Airtable had the advantage over excel that it was web-based, but also that more than one option could be selected in each cell (unlike excel).

Step 5: Quality assure your content
If you are looking to signpost to external resources, quality-assuring what features on your website is an important step. We spent considerable time collating appropriate supports and services for inclusion and undertaking a quality assurance process for each site or resource. We quality assured the websites by checking the domain name, reviewing if there were ways to contact the service, and checking the security of the website. We looked for content that was credible, factual, and had supportive evidence where it was appropriate.
Step 6: Ensure it is inclusive and accessible
A key component of web development is taking sufficient time to consider whether it is accessible and inclusive for everyone, and making any changes that are required. For example, to help us achieve this, we undertook an Equality Impact Assessment (EQIA) for the site to identify areas for improvement and to ensure it is inclusive. The EQIA highlighted there could be more information for people with a disability and neurodiversity, so we created new topic areas. Accessibility was also improved to allow people whose first language was not English to access the site using a translator widget.
Step 7: Consultation
Once you have a draft of the website that you are happy with, it’s time to undertake a consultation with your target audience to hear their thoughts on it and any areas that could be improved. This could be done via surveys, interviews, or focus groups. Consider hosting interviews or focus groups with people who were not involved in creating the website as this can lead to more honest feedback.
For example, we undertook a consultation on the draft site with local youth groups, youth forums, a variety of staff groups, and the working group leading the project to receive feedback, seek improvements, and undertake an additional check of content accuracy.
We also sent a survey to schools with a draft version of the site for feedback and suggested improvements as well as holding guided discussions at stakeholders’ team meetings. Focus groups took place with youth council members, the local youth forum, and youth groups to receive feedback on content, design, and usability.
Step 8: Marketing and Evaluation
Finally, you’ll want to create a communications plan to help you spread the word about your new website. Consider who you want to know about the website and what channels you should share your messages on that would best reach them.
To help us do this, we created a communications plan to ensure information about the website was widely distributed. We used a Gantt chart to guarantee that information was shared in a consistent and scheduled manner. To promote our website, we created materials such as digital and hard copy posters and a ‘Z card’ which were all shared at local partnership forums, education meetings for key staff groups, on HSCP and WDC social media channels, and through system-wide distribution lists that covered our target audiences. Currently, we are working on a follow-up communication plan and planning to implement promotional material such as badges for staff with a QR code linking to the website. We are also continuously evaluating our progress through monthly analysis of Google Analytics.
Software and tools
We used the following tools as part of this process:
Gitmind
A free online AI-powered mind mapping and brainstorming tool we used in the initial scoping phase when considering content for the website.
Visit Gitmind
Airtable
A collaboration tool that all teams could access to collate and edit service information for tagging. It is a safe, secure, and flexible platform for collaboration.
Visit Airtable
Umbraco
An open-source content management system we used to manage the website content. The system is fully extendable, highly customisable, and user-friendly. Editors can fulfill daily tasks, preview and publish content, and schedule campaigns.
Visit Umbraco
Did you find this useful?
Great! Please tell us how this helped.
How could this be improved?